This is fourth and the final part of the series of posts related to creation of Costing Sheet. For previous parts click on the following links:
Part-I
Part-II
Part-III
In the previous three posts we have already understood about creation of various components required for maintenance of a Costing Sheet. Now in this post we will see how the components in combination help us to create a Costing Sheet.
Part-I
Part-II
Part-III
In the previous three posts we have already understood about creation of various components required for maintenance of a Costing Sheet. Now in this post we will see how the components in combination help us to create a Costing Sheet.
Implementation Consideration
IMG Path: Controlling > Product Cost Controlling > Product Cost Planning > Overhead > Basic Settings for Material Costing > Define Costing Sheets
System will navigate us to the following screen:
IMG Path: Controlling > Product Cost Controlling > Product Cost Planning > Overhead > Basic Settings for Material Costing > Define Costing Sheets
System will navigate us to the following screen:
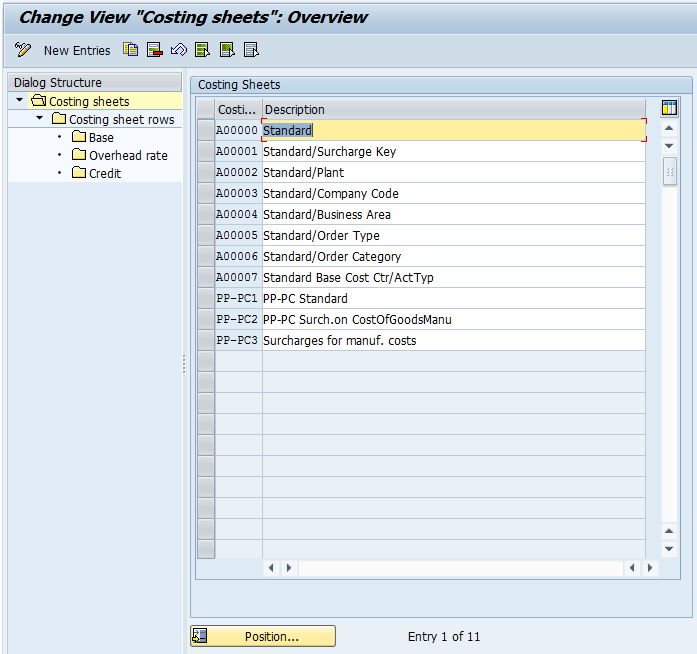
Here we first need to understand about the various columns made available by SAP and their purpose
ROW
This column contains serial numbers of the lines that will be created
BASE
Under this column, we have to enter the Calculation Base Key created.
OVERHEAD RATE
Under this column, we have to enter the Overhead Rate Key created.
Description
This is non-editable column which gives us the description of the Calculation Base Key
FROM and TO
Under these columns we will be entering the Row Number to be considered for calculation
CREDIT
Under this column we enter the Key created for booking credits.
Once we have understood with the information about various columns available under Costing Sheet, we will move forward to first step under Costing Sheet i.e. Calculation Base
Step - I
Calculation Base
Select the Row No. 10 which contains Calculation Base as B000 (Material) and double click on the Base Tab on left hand side of the screen and the system will navigate us to the following screen:
In the image above, we can see that SAP has already provided various Costing Sheets. We will use Costing Sheet PP-PC1 (PP-PC Standard) for our understanding purpose
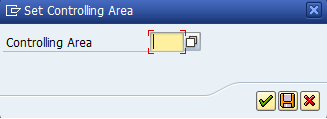
Select the Costing Sheet PP-PC1 and double click on Costing sheet rows tab on the left hand side and the system will navigate us to the following screen:
Select the Costing Sheet PP-PC1 and double click on Costing sheet rows tab on the left hand side and the system will navigate us to the following screen:
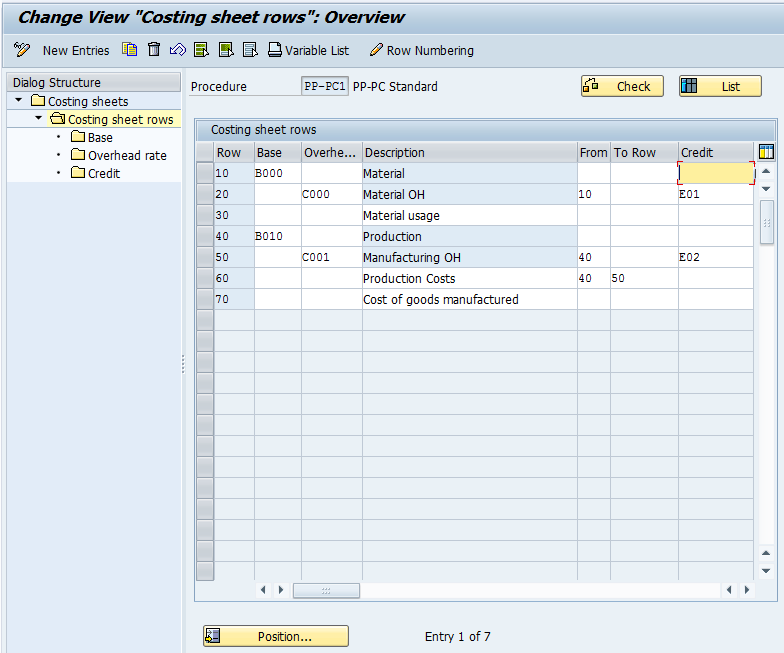
Enter the appropriate Controlling Area and press enter and the system will navigate us to the following screen:
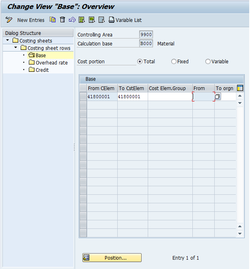
This part has various columns available for entry; let’s understand them one by one:
Column: FROM CELEM Column: TO CSTELEM
Under this column, we will have to enter the Cost Elements that contain value of material consumed. In other words we need to enter the Cost Elements assigned to book the Consumption of components for e.g. Packing Material/Raw Material/Semi Finished Goods etc. as per the requirement. Here we need to ensure that we enter only those cost elements which are necessary as the system considers total of these cost elements to calculate the overheads.
Column: COST ELEM. GROUP
In cases where Cost Elements are not in sequence, we can create a Cost Element Group and assign it here.
Column: ORIGIN GROUP FROM Column: ORIGIN GROUP TO
Origin Group is a key which can be assigned in Material Master.
Given below is a brief information about Origin Group
These groups serve to further subdivide the material costs. For controlling purposes, materials assigned to the same cost element by automatic account determination can be separated into origin groups. You enter the origin group in the costing view of the material master record. This helps us to consider values pertaining to particular material codes.
Once we maintain the appropriate values in all the columns we will have to save the said configuration.
Above these columns, we have an option to select if this cost constitutes part of Fixed or Variable cost.
Step - II
Overhead Rate
Now we are through with the configuration required for Calculation Base, the next step in this configuration is to look into Overhead Rate Key. For this select the Row No. 20 and double click on Overhead Rate tab on the left hand side of the screen and the system will navigate us to the following screen:
Column: FROM CELEM Column: TO CSTELEM
Under this column, we will have to enter the Cost Elements that contain value of material consumed. In other words we need to enter the Cost Elements assigned to book the Consumption of components for e.g. Packing Material/Raw Material/Semi Finished Goods etc. as per the requirement. Here we need to ensure that we enter only those cost elements which are necessary as the system considers total of these cost elements to calculate the overheads.
Column: COST ELEM. GROUP
In cases where Cost Elements are not in sequence, we can create a Cost Element Group and assign it here.
Column: ORIGIN GROUP FROM Column: ORIGIN GROUP TO
Origin Group is a key which can be assigned in Material Master.
Given below is a brief information about Origin Group
These groups serve to further subdivide the material costs. For controlling purposes, materials assigned to the same cost element by automatic account determination can be separated into origin groups. You enter the origin group in the costing view of the material master record. This helps us to consider values pertaining to particular material codes.
Once we maintain the appropriate values in all the columns we will have to save the said configuration.
Above these columns, we have an option to select if this cost constitutes part of Fixed or Variable cost.
Step - II
Overhead Rate
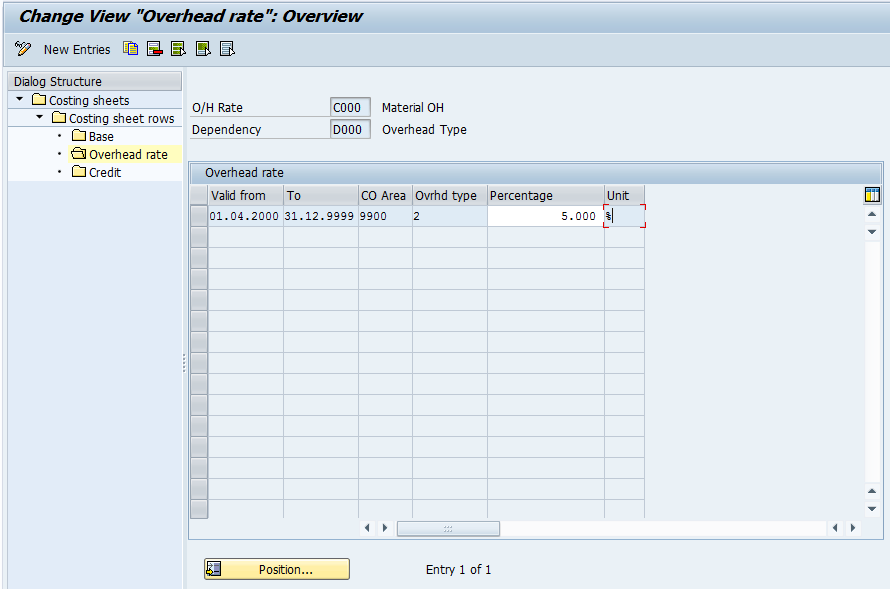
Now we are through with the configuration required for Calculation Base, the next step in this configuration is to look into Overhead Rate Key. For this select the Row No. 20 and double click on Overhead Rate tab on the left hand side of the screen and the system will navigate us to the following screen:
Here we find following columns:
Column: VALID FROM Column: VALID TO
This is Validity date of the Overhead Rate. In other words it means, we can maintain different rates for same Overhead Rate Key for different periods. For e.g. We may maintain 5% for 1st Quarter and 6% for 2nd Quarter.
Column: CONTROLLING AREA
Enter the appropriate Controlling Area here
Column: OVERHEAD TYPE
The overhead type differentiates between planned and actual overhead surcharges. Options available are given below;
1 Actual overhead rate
2 Planned overhead rate
3 Commitment overhead rate
Column: PERCENTAGE
Enter the appropriate Percentage here
Column: UNIT
Leave blank and the system will consider this to be percentage.
This completes our configuration of Overhead Rate Key.
Step - III
Credits
Now we will move ahead to the last step where we maintain the Credit Key. For this select the Row No. 20 and double click on Credit tab on the left had side of the screen and the system will navigate us to the following screen:
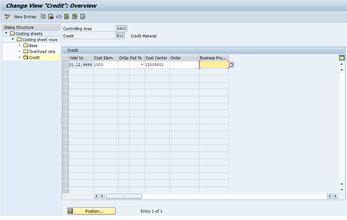
Here also you will find lot information that is to be entered by us. We will look into everything one by one:
Column: VALID TO
Here we do not have an option to enter From and To Date, rather we have to enter Valid to date.
Column: COST ELEM.
Here we have to enter a Cost Element with Category 41 created specifically to carry the costs to be credited to the Cost Centre.
Column: ORGRP
Origin Group, as explained earlier, we can maintain different cost elements based on different origin group. This key basically helps us to divide the costs for various materials based on categorisation.
Column: FXD%
This column allows us to idenfity Percentage of an amount represented by fixed costs. The default entry is "*" which means that the fixed and variable portions of the surcharge are determined in the same way as the fixed and variable costs in the calculation base.
Example
A total of $1000 is charged to an order, of which 60% is fixed costs and 40% is variable costs from a cost element. You want to add a further 10% for overhead surcharges.
You specify a cost center as the credit object for the offset posting.
If you enter "*" in the fixed percentage field, the surcharge will be comprised of 60% fixed costs and 40% variable costs. The cost center to
be credited is credited with the same amounts in fixed and variable costs.
If you enter "100" in the fixed percentage field, the whole surcharge will be comprised of fixed costs. This may be necessary, for example, if the cost center cannot accept variable costs.
Column: COST CENTRE / ORDER / BUSINESS PROCESS
Enter the Cost Centre / Order or Business Process that will accept the credit for the overhead here
Enter all the data and save the same. Now our Costing Sheet is ready for assignment and use.
Reference Material:
Costing Sheet
Origin Group
 RSS Feed
